

Common Questions
If you transform point clouds in TerraScan from one projection system to another, the coordinate setup must be defined in a way that coordinate values of both projection systems are covered by the coordinate range. However, this is impossible if coordinates are stored with high resolution (millimeter), and if coordinate values are very different in the two systems. Then, either the source or the target coordinate values are outside the coordinate range and TerraScan fails to load data correctly into memory. By creating a new project, importing the original point cloud into it and applying the transformation in the import process, this problem can be solved.
Try the following workflow:
1. Define the coordinate setup in TerraScan in a way that it fits to the coordinate values of the target projection system.
2. If you want to keep the original project structure, transform the block boundaries of the existing project to the target system. Otherwise, create a new project.
3. Save as a new project file into a new folder for storing the laser data.
4. Import the points of your original project blocks (in the source projection system) into the new project and apply the transformation to the target projection system in the import process.
Only the Import points into project and Read points processes are able to load points correctly if the coordinate range does not fit source and target coordinate systems. The range must fit to the target system. Macro steps for transforming points only result in correct coordinates if the coordinate range fits to both, the source and target system.
This message appears if the coordinates of the laser data have millimetre (mm) resolution but the resolution of the coordinates in TerraScan is set to centimetre (cm). You can change that in TerraScan General Tools > Define Coordinate Setup. Set Resolution = 1000 (mm = 1000, cm = 100). When you increase the resolution, the coordinate range gets smaller (see lower part of the dialog). Therefore, it might be necessary to change the coordinates of the Origin Easting and/or Northing as well to make the range fitting to the data. Set the Easting/Northing to some value closer to your project’s coordinates. Check in the lower part of the dialog, that the coordinate range includes the coordinate values of your dataset.
The problem is related to the coordinate setup of TerraScan. The coordinate setup defines what coordinate values of points can be loaded into TerraScan. The corresponding tool is in TerraScan General tools > Define Coordinate Setup.
The tool’s dialog shows coordinate ranges for Easting, Northing, Elevation. All points with coordinates inside these ranges can be handled in TerraScan. Depending on the resolution of point coordinates, the ranges are bigger (cm resolution = 100) or smaller (mm resolution = 1000). If the coordinates of laser points are outside the range, the Origin Easting and/or Northing coordinates must be changed in the dialog. Set it to a value closer to the points’ coordinates. Then, check the coordinate ranges again and make sure that the points’ coordinates are falling within the ranges. Watch the video here
This a result of a new feature in TerraScan. Now TerraScan supports most of the coordinate systems and it is possible to pick from the list. If you need to do transformation it can be done while importing points by choosing input and active projection.
Watch this webinar about coordinate transformation in the latest versions (from 59:30min).
TerraScan supports several input formats for time stamps, such as GPS standard time, GPS time, GPS seconds-of-week, Unix time (trajectories only). TerraScan can handle the GPS time stamp formats for data processing. GPS seconds-of-week can be used if the data of a project is captured within a week (Sunday 00:00:00 till Saturday 23:59:59). GPS time or standard time must be used for data of projects that is captured within several weeks. Unix time must be converted into a GPS time format when a trajectory is imported. Trajectories and points must store time stamps in the same format in order to allow the assignment of points to trajectories. The time stamp format can be converted for both data types during the import of data into TerraScan, by using menu commands or macro steps (point data only).
It is recommended to organize a point cloud in a TerraScan project and project blocks for processing the data. TerraScan has it’s own binary formats for project blocks, such as Fast Binary, Binary 8-bit and Binary 16-bit. LAS or LAZ formats can also be used to store point data in project blocks. Fast binary is the recommended format for processing data in TerraScan (and using point clouds in other Terrasolid applications). LAS and LAZ formats are suited for data exchange between different software products; LAZ is also the best choice for archiving data.
If your input data is in LAS 1.4 format and you need to deliver LAS/LAZ 1.4 format as well, it is recommended to keep the LAS 1.4 format for the project in TerraScan. There are some limitations for storing LAS/LAZ 1.4 format with TerraScan. TerraScan does not store coordinate system information in the file header. It can not store near-infrared values for points.
32-bit and 64-bit Terrasolid software:
LAS 1.0, 1.1, 1.2 have reading and writing support. LAS 1.3 has only reading support.
LAZ 1.0, 1.1, 1.2, 1.3 have reading and writing support.
64-bit Terrasolid software:
LAS 1.4 has reading and writing support.
Mismatch in MLS point clouds is most often caused by inaccuracies in the trajectory solution. Failure of GPS signal during the data collection leads to more and more increasing positional errors. The mismatch can be removed in TerraMatch by applying fluctuating corrections. This may include internal corrections (line-to-line matching) as well as absolute positional adjustments (point cloud-to-control points matching).
The recommended workflow strategies for matching data to control points and internally are:
Two separate matching steps for XYZ: 1st to control points, 2nd internally
- good workflow in general, always applicable and leading to good results
- better results if mismatch is big between point cloud and control points
- removes the big mismatch first, following tie line observations for internal matching are cleaner and lead to better result
One single matching step for XYZ: matching to control points and internally
The result of the matching process should be equally good as with two separate matching steps,
- if there are enough control points (not too long distances between consecutive control points) and the trajectory is not drifting back and forth between control points
- if there is no big mismatch between the point cloud and control points
For an additional Z correction, it is always recommended to run a separate matching step, if required. This should continue from the corrected observations of the first matching step(s).
Since TerraScan version 23.034, the software has validated the coordinate setup when importing points to a project. The coordinate setup must follow the setup used with the project.
If the error message reports problems with all the blocks:
- Use Define coordinate setup -tool, and adjust the active coordinate setup to match the setup reported by the error message.
- Import the points normally
If the error message reports problems with some of the blocks, run a macro on all the blocks to synchronize the coordinate setup stored for each point cloud file:
- Use Define coordinate setup -tool, and adjust the desired setup.
- Prepare a macro with Transform points > Dz: 0.0 m/ft.
- Run the macro on the project blocks. Use Save points: Create new copy.
The macro with a transformation routine forces the application to load and update the coordinate information. Setting the adjustment magnitude zero ensures no coordinates are modified. - Open the new version of the project.
- Import the points normally
You can re-open the dialogs using Key-in commands in Bentley CAD environment, or Spaccels in Spatix. Use the following commands:
– scan open main window to open the TerraScan Main window.
– photo open main window to open the TerraPhoto Main window.
The Speed setting in the Display mode dialog determines, whether TerraScan draws only a selection of points depending on the zoom level or all points on the screen.
The final decision of what points are drawn on the screen is made by MicroStation, not by TerraScan. Points at the edge of a section view or the depth boundary of a top view may be drawn at some zoom levels and not at other zoom levels. For manual classification tasks, set Speed = Slow – all points in the Display mode dialog for the section view. If possible, use Display method = Raster (switch on Use depth in the Display mode dialog or set the Display method in TerraScan Settings). Move section tool should use Move by = Half of view depth. This makes sure that each point is displayed in two consecutive section views when moving forward/backward, maybe at the edge of one section and in the center of the next section.
This is an unclear visualization problem. The point display becomes transparent which often looks like a gray overlay (the black view background is shining through the points). This happens most often if the Display method is set to Raster (in TerraScan Settings or if Use depth is switched on in the Display mode dialog) and if no vector data is displayed in the view. The point display becomes normal again if vector elements are drawn in the view or if the Display method is set to Points.
Most probably the dialog has accidentally shifted outside the visible screen space.
Try closing the application, deleting the application specific positions.upf example preference file storing the dialog positions (for example, \terra64\tscan\positions.upf for TerraScan), and relaunching the application.
First of all, ensure you have set up TerraBatch on all the worker computers with the dedicated setup package. Only this package installs the functionalities required from the processing backend.
Secondly, ensure the TerraBatch service executable is properly registered in Windows Services of each batch computer. The service monitors new tasks and triggers process execution when tasks are assigned.
If the service has not registered, run TerraBatch setup again with administrator rights. Alternatively, register the service manually via the command prompt:
sc create TerraBatchService binpath= “c:\terra64\tbatch\tbatch_service.exe” start= auto obj= “DOMAIN\username” password= “PASSWORD”
Refer to the local domain with .\ (=”.\username”).
The user account used must have privileges to access data both on the master and slave computer.
The CAD platform loads Terrasolid tool icons from Terrasolid application files. If icons are not loaded properly, the setup potentially failed to write necessary configuration, or the Bentley CAD application might have lost the link to the icons due to CAD application update.
To fix the problem, try reinstalling Terrasolid software. Remember to:
- Unzip the setup package
- Close all instances of the CAD application you use
- Run the setup.exe as administrator
- Apply correct CAD platform directory during the installation (for example, correct path for MicroStation 2023 installed in the default locations is C:\Program Files\Bentley\MicroStation 2023\MicroStation\)
If this does not solve the issue, check if terra.cfg configuration file was copied to the structure of your preferred Bentley CAD application (Default location for MS 2023 being C:\Program Files\Bentley\MicroStation 2023\MicroStation\config\appl). You may copy the file manually from the setup package to the destination, if necessary.
If you use multiple Bentley CAD products, run the setup/copy the file to the structure of each application separately.
The error message Library ‘C:/terra64/app/tscan.ix’ not loaded. on Spatix platform indicates the linkage between the CAD platform and the Terrasolid application is not successful.
To solve the error re-install the applications. The setup application refreshes the link between the applications. You may run the setup on the existing installation, removal of the old installation is not required.
- Download the Terra for Spatix setup
- Unzip the setup package
- Close all instances of the application
- Run the setup.exe with administrator rights
- Follow the setup wizard
After finishing the setup, launch the application and validate the installation. Make sure to run the Spatix executable installed during the setup in case you have the application installed to multiple destinations.
Terrasolid applications include several built-in geoid models. However, sometimes additional or restricted models are needed.
The two main formats for a custom geoid are:
- ISG file format
- Text format table (space separated X Y dZ)
If your geoid model is in a different format, convert the model to a supported format.
The text file format is simple, thus widely available with different tools from simple text editor to GIS applications. For the text format file there are two key points to ensure proper formatting:
- Each text file row represents a single correction point, space separating the columns
- The XY coordinates must be in the same projection system as the point cloud during the processing
Some geoid models can be converted to this format using Convert geoid model tool. If TerraScan can parse the model format as points (like Geotiff), you can convert the model importing it using Read points with necessary reprojection, and saving the points to text format using Save points as in Format: E N Z.
For further information, watch our related videos and see the geoid adjustments in the user guide.
The New drone project and Process drone data tools are utilities simplifying uav data processing by bundling several tools together. The tools lists some systems, but many other systems are supported by the software.
We are adding definitions for additional systems all the time. If a system relevant to you is missing definition, please send us feedback. To add new system definitions, we need suitable data sample demonstrating the system capability.
Download the Terrasolid ribbon customizations for Bentley CAD tools using this link.
Extract the zip package, and follow the instructions from the included pdf-document to set-up the ribbon customizations.
You can check the hardware recommendations from this technical note: Computer Hardware Recommendations for Terra Applications
Common Licensing Questions
There is no way to “return” licenses without using the License Manager on the client computer. If this doesn’t work anymore, you have to wait until the license period has expired. Therefore, we recommend license check-out periods of a reasonable time frame, e.g. 7 – 14 days, to avoid longer license availability problems
You can download the software from the common Terrasolid software download page. In “Platform selection” section, select “32/64-bit Windows” option from the “Stand alone applications” and click Continue. Then, the list of available software includes License Server & Manager as option.
You have to download the package if you want to install both, Server and Manager on a computer, but also if you just want to install one of the modules. The selection of what to install is made during the installation process.
Double-check the Access code in the License Server and License Manager apps:
- License Server File > Settings
- License Manager File > Settings
The Access code must be exactly the same in both applications.
After changing settings for the License Server/Manager and/or copying new license files into the network license folder on the server, you must restart the License Service in the Services dialog of Windows. Only after the restart, the service can recognize changes. It is recommended to pause the service when you do changes or license file updates, and resume the service after all changes are done.
You can connect to the License Server and check out licenses via Virtual Private Network (VPN).
However, there might be some network or firewall settings which prevent the successful communication between Server and Manager.
In general, licenses must be requested using the License Manager before a software product can be used on a client computer. An exception is TerraBatch. If TerraBatch is running on the same computer as TerraScan and if a network license is available for TerraScan, there is no additional license required for running TerraBatch on this computer. If TerraBatch is running on a separate computer without TerraScan, it can be configured to request a license automatically.
Download and install Terra License Server and Manager, test the communication between Server and Manager, and register your License Server with Terrasolid. This is described in detail on the Licensensing webpage.
When Terrasolid has send you license files, stop the Terra License Service (if applicable) and copy the license files to the pool license folder of your License Server installation directory. The default directory is c:/terra/pool0xx, where xx stands for the latest major version number. Restart Terra License Server and Terra License Service (if applicable).
Alternatively, you may restart the PC after copying new license files into the /pool0xx folder.
New license files are recognized by the License Server after the License Server Application and Service is restarted. First, copy the new license files into the /pool0XX folder of your Terrasolid installation directory. Then, open the Windows Services window and restart the TerraLicenseService0XX. Open the License Server Application interface and check that the new license files are available.
The License Server/Manager communication uses SMB protocol. It’s enough that the Manager can connect via LAN or VPN to the Server to generate and return the licenses from/to the license pool folder. The number of the port used for communication depends on the local situation. Therefore, we cannot say in advance which port must be opened, e.g. in firewall settings. You should just start the communication by the License Manager and check which port it tries to use.
There are a few rules to follow strictly to setup License server and License manager successfully:
- Install License Server/Service and License Manager software directly on the PC acting as server and with administrator permissions (Right mouse click on setup.exe file > Run as administrator). It is not enough to just copy the applications’ .exe files into the target folder.
- By default, the License Server is installed into the Terra installation directory, /pool0XX, where XX is the major version number of the software. This is the same folder in which the license files must be stored. The License manager is installed into the Terra installation directory, /license. You should not change the name of the default target folders. The Terra installation directory is up to you.
- Verify your server PC is discoverable and accessible by client computers on your private network.
- Go to Windows Settings > Network & internet > Advanced network settings > Advanced sharing settings > Private networks > Network discovery
- Go to Local Security Policy > (Security Settings) > Local Policies > User Rights Assignment > Access this computer from the network
- Verify the network connection between computers. Use Windows File Explorer, type the UNC path of the server computer (e.g., \\DESKTOP-ABC123) to the file path field on the client computer and hit enter to connect. This should show the files shared on the server file system. If this step requests for authentication, authenticate, and try using license manager after successful connection. Refer to this video for more details.
- Define settings in the License Server, File > Settings:
- Choose an Access code and a maximum duration time for license check out (small amount of days recommended).
- If the No reply from server message appears after successful use of the setup, some power saving feature might be shutting down background processes, killing the license service. Define Reopen pipe parameter for the setup to periodically refresh the connection endpoint on the server end.
- Define settings in the License Manager, File > Settings:
- Choose the Server from the selection list or type the name of the server machine. If you click on the >> button and there are no available PCs in the selection list, the software does not find any potential server machines in the Windows network.
- Type the same Access code as defined in the License Server settings. Make sure that the typing of server name and access code are correct. The values are case-sensitive.
- After changing settings in the License Server or after copying new license files to the/pool0XX folder on the license server machine, you must restart the License Server/Service. You can restart the service in the Windows Services window or by restarting the PC. Changes in settings will be recognized by the License Service only after a restart. New licenses will be available for check out only after a restart.
- In the License manager, check View > Server state. Select the correct major version of the software in the Version Set Information = Overview. The window should now show the number of available licenses on the server.
Please double-check all the above points in case of connection problems before contacting Terrasolid support or sales.
More information about the License Server/Service and Manager setup process
Yes, if License Server is installed as application only. License Server application does not run as a background service. It must run if someone wants to check out or return licenses from client computers.
If License Server is installed as service, the application dialog serves only as user interface for settings. It can be closed and license check-out/check-in is still possible as long as the service runs.
You can run two instances of license_server.exe or two Terra licenses services at the same time. You just need to have two separate installation folders, such as c:\terra\pool017 and c:\terra\pool018. Each folder must contain its own copy of license_server.exe and its corresponding license files. However, Terrasolid provides network licenses only for the latest software version. Therefore, the license files expire on 31st of March every year. After that, a new version of License Server is required in order to serve for the new license files. Therefore, it is rather uncommon that there are two versions of License Server required.
It is not recommended to allow long check-out periods for network licenses.
In general, server licenses for one major version are valid until 31st of March of the year following the release of the major version (e.g. version 014 is valid until March, 31st, 2015). If you request a license for more days then the number of days until next 31st of March from the server, the license will be valid on the client computer until the expiration date of the longest-lasting free license on the server. The reason behind the yearly changing major version number is that customers must have a maintenance agreement to update to the next major version. Without renewing the maintenance agreement, customers get node-locked licenses for their latest software version after their network licenses expired.
L13. WHEN I RUN SETUP.EXE FROM LICENSE_SERVER.ZIP, AN ERROR MESSAGE APPEARS: 'FILE % WAS NOT FOUND'.
Copy the license_server.zip to another location (e.g. c:/temp) and run the setup again.
The 64-bit TerraBatch expects a license file called “tbatch.lic” while 32-bit TerraBatch expects a file called “tbatch_scan.lic”. If you are using the same license file for x32 and x64 TerraBatch, just rename the file for x64 TerraBatch in the \license folder of the x64 Terrasolid installation folder.
If License Server is installed as application only, it typically closes on users’ log out. This can be avoided by switching the user or locking the computer instead of logging out. The better alternative is to install the License Server as service.
You need the license server and manager if you want to use network licenses for Terrasolid applications. The license server is used on one computer (acting as “server”) to manage the network license files. The license manager is used on all computers that need the licenses for running Terrasolid applications
Please check the following:
- The License Manager has been installed with administrator permissions.
- The user has standard Windows users’ permissions and READ AND WRITE permissions for the license folder in the Terrasolid software installation directory (e.g. c:/terra/license) on his computer.
- Be sure that the license folder setting points to the correct folder. E.g., if you have installed Terrasolid applications for MicroStation V8 in /terra/ and for V8i in /terrav8i/ folders, check the license path in the configuration of MicroStation or Terrasolid software (in file ‘cfg‘).
1) in Terra License Manager find File –> Settings –> Server –> copy/paste name of your server-computer or type it manually without going to select the server from the list (i.e. no need to press the side arrows >>)
2) check the level of sharing: the recommendation is to share the folder rather than sharing the entire drive
3) you need to provide full read/write/access rights via your network to ..\terra64\pool022 folder
4) check the firewall permissions
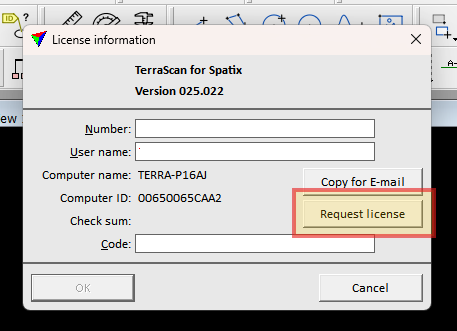
- Download and install the application: Software Downloads
- Start the CAD platform (MicroStation or Spatix). If using MicroStation, initialize a new file using seed in \terra64\seed\
- The licensing dialog pops up. Press Request license button and fill the web form.
Submit the form and we will soon send you the licenses for your trial!
User manuals
Find detailed user guides for all Terrasolid products and applications
Training Path
Check out our training path for more training materials
Help Center
Need dedicated support? Submit a ticket and receive help