

TerraModeler User Guide
Create Region
Not Lite, Not UAV
 Create Region tool creates a new region definition. A region is defined by boundary lines that form closed areas. When a region is created, the region definition is added to the list in the Regions window and a center marker is placed inside the boundary lines.
The software creates a region from lines that are visible in a top view and form a closed area around the region center point. The elevation of the lines also effect the elevation of the region shapes. It is recommended to work with 2D elements or at a single elevation level when working with regions. If necessary, the correct elevation values can be assigned to the final region shapes by using, for example, Linear Elevation tool or Drop Element On Surface tool in TerraModeler, or the Drape Linear Element tool together with point cloud data in TerraScan.
The boundary line network should form closed areas in order to ensure that regions can be created. However, the lines can overlap each other or be located on different CAD file levels. There are some tolerances regarding gaps in the line network that are defined in Regions / Region design category of the TerraModeler Settings.
Each region belongs to a region types. A region type can refer to, for example, a category of land use. The region type determines the symbology used for visualizing the regions. Region types are defined in Regions / Region types category of the TerraModeler Settings.
When a region is created, a center marker is placed inside the region area. The center marker can be labeled with a so-called title. The title can include some information about the region. It is drawn as text element into the CAD file. Title formats are defined in Regions / Title formats category of the TerraModeler Settings.
To create a new region definition:
1. Select the Create Region tool.
2. Click inside boundary lines that define the region area.
This opens the Region Information dialog:
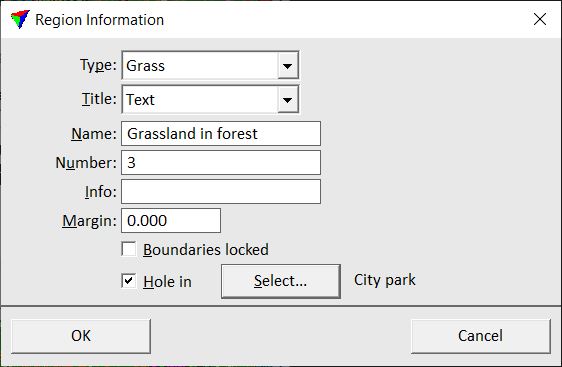
3. Define settings for the new region.
4. Click OK.
This adds the region definition to the list. You can continue with step 2.
Setting |
Effect |
|---|---|
Type |
Type of the new region. See Regions / Region types category for instruction how to define region types. |
Title |
Title format for labeling the new region. See Regions / Title formats category for instruction how to define region titles. |
Name |
Free text that is used a name for the new region. |
Number |
Number of the region. Counts up automatically. |
Info |
Free text that is used as additional information about the new region. |
Margin |
Area added around a region as a placeholder, for example, for line pattern that need more space than a simple line. The region is shrunk by this value in order to avoid overlap between adjacent regions when using different line pattern for the display. |
Boundaries locked |
If on, the region is not recomputed when using the Update Regions tool after the boundary line elements were modified. |
Hole in |
If on, the new region is defined as a hole. If the area of the new region is completely surrounded by another region, the option is switched on automatically. The name of the surrounding region is displayed next to the Select button. If the region should not form a hole, click on the Select button and select Not a hole in the Select parent region dialog. |
Create region tool does not draw the region shape or any other display into the CAD file. Use Update Regions tool in order to display the region.