

TerraPhoto User Guide
Search points
Search points command starts the automatic color point search. The software can place color points of types Average (Ground ortho and Point cloud color points) and Grey average (Ground ortho color points) automatically. The search can be restricted to certain areas, images, and a color point density.
The automatic method first searches for a large number of potential color points. Then, it rates each point by checking if the point is needed and fits into the correction model. Finally, the best points are selected. After the automatic search, it might be good to check for bad color points using Find worst, Find first bad, or Find next bad commands and/or to filter out bad color points automatically using the Filter bad command.
The settings for the automatic search depend on the color point mode. The color point mode is selected when the Define color points command is started. See the command’s description or Color points and selection shapes for more information about color point modes.
To search color points for (ortho) rectification automatically:
1. Select Search points command from the File pulldown menu.
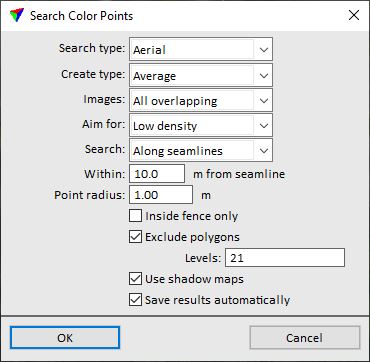
This opens the Search Color Points dialog:
2. Define settings and click OK.
If Save results automatically is switch on, the Save auto search results dialog is opened, a standard dialog for saving files.
3. Define a location and name for the color points file and click Save.
The application starts searching for color points. A progress window indicates which step is processed.
SETTING |
EFFECT |
|---|---|
Search type |
Defines how color points are placed related to the shape of the search area: •Aerial - search within an aerial project area. Color points are placed all over the area. •Along centerline(s) - search along selected linear elements. This requires that at least one line or shape element is selected in the CAD file before starting the search. |
Create type |
Type of the color points: •Average - intensity and color values are averaged. •Grey average - color values are balanced in order to get the averaged gray value. |
Images |
Defines what images are included in the color point computation: •All overlapping - all images that see the color point location. •Assigned only - only images which contribute to orthophoto pixel colors inside the color point radius. If the color point is placed at the seamline of two images, only those two images are used to compute the target color. This may exclude unwanted coloring effects from more distant images. •Upto 2 ... 6 closest - up to the given number of images closest to the color point location. |
Aim for |
Defines the density and thus, the overall amount of color points: •Very low density - generates the smallest amount of points. •Low density - generates fewer points. •Medium density - generates a medium amount of points. •High density - generates more points. •Very high density - generates the highest amount of points. |
Search |
Defines the area for color point search related to raw images: •Everywhere - searches color points within the whole image. •Along seamlines - searches only close to image seamlines Within the given distance. |
Point radius |
Size of color points. Defines the area that is used for computing the color point’s intensity and RGB values. |
Inside fence only |
If on, color points are placed inside a fence only. This requires that a Bentley CAD fence has been drawn before the command is started. |
Exclude polygons |
If on, no color points are searched inside shape elements on the given CAD file Levels. Separate several levels by comma. |
Use shadow maps |
If on, the routine uses shadow maps stored in the \TEMP directory of the mission. See Compute shadow maps for more information. |
Save results automatically |
If on, the routine saves color points in regular intervals into the active color point file. If a new file is started, the software asks for a location and file name for storing the color points. |
To search color points for point clouds automatically:
1. Select Search points command from the File pulldown menu.
This opens the Search color points dialog:

2. Define settings and click OK.
The application starts searching for color points. Depending on the size of the point cloud, the process may take some time.
SETTING |
EFFECT |
Laser points |
Defines the source of the point cloud: •Loaded points - points loaded in TerraScan. •Active project - points referenced by a TerraScan project. |
Point radius |
Size of color points. Defines the area that is used for computing the color point’s intensity and RGB values. Color points should be big enough to contain a few pixels in the raw images also at a longer distance in order to allow the averaging of colors. |
Aim for |
Defines the density and thus, the overall amount of color points: •Very low density - generates the smallest amount of points. •Low density - generates fewer points. •Medium density - generates a medium amount of points. •High density - generates more points. •Very high density - generates the highest amount of points. |
Inside fence only |
If on, color points are placed inside a fence only. This requires that a Bentley CAD fence has been drawn before the command is started. |
Save results |
Defines how color points are saved: •No automatic save - color points are not saved immediately into a file on a hard disk. •One file - all color points are stored into one file. The file is created automatically when the color point search is started. •File for each block - a separate color point file is stored for each block of the TerraScan project. This is recommended for big projects in order to allow more structured manual work after the automatic search. This is only active if Laser points is set to Active project. |
Folder |
Storage directory for color point files. This is only active if Save results is set to File for each block. |