

TerraScan User Guide
Inspect Groups
Inspect Groups command supports the systematic check of groups. It provides a list of groups from which you can select one group after the other.
The tool includes view settings that define CAD file views displaying the selected group in different view orientations. The selected element is automatically centered in these views. It becomes the active displayset and thus, it is displayed in views for which Points is set to Displayset only in the Display mode dialog. In addition, the tool allows the definition of up to four classification buttons for modifying the class of a group.
To inspect groups:
1. Select the Inspect Groups command from the Groups pulldown menu.
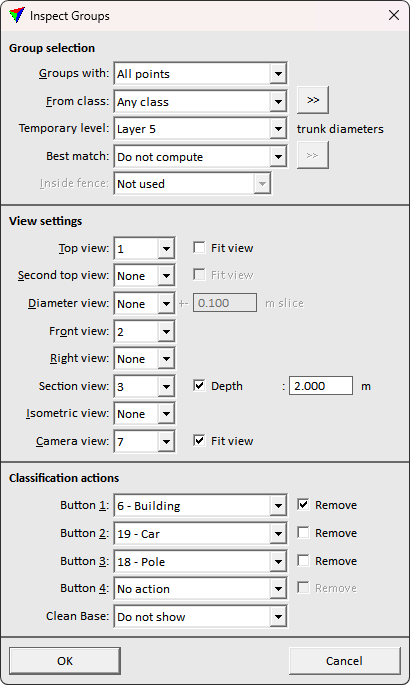
This opens the Inspect Groups dialog:
SETTING |
EFFECT |
|---|---|
Groups with |
Determines which groups are inspected: •One or more points - groups with one or more points in the source class. •Majority of points - groups with the majority of points in the source class. •All points - groups with all points in the source class. |
From class |
Point class(es) that are included in the group inspection. |
|
Opens the Select classes dialog which contains the list of active classes in TerraScan. You can select multiple source classes from the list that are then used in the From class field. |
Trunk diameters |
CAD file level that contains circular elements representing tree trunks. The elements may be created by using the Measure Trunk Diameters tool. The elements are used to extract diameter values to show in the list dialog. |
Best match |
If enabled, best match confidence is computed for each group in the matching object class and can be viewed during the validation process. |
|
Opens the Best match classes for selecting the classes of different object types. |
Inside fence |
Determines how a fence or selected polygon(s) effect the classification: •Not used - fence or selected polygons are ignored. •One or more points - groups are classified if one or more points are inside. •Average xy - groups are classified if the average xy point is inside. •Majority of points - groups are classified if the majority of points is inside. •All points - groups are classified if all points are inside. |
Top view |
View window that displays the point cloud in a top view. |
Second top view |
View window that displays the point cloud in a top view. |
Diameter view |
View window that displays horizontal section around the selected diameter measurement. Use Inspect groups / View / Diameters to open the list of diameter measurements. |
Front view |
View window that displays the point cloud in a front section view. The cross section is 90 degree rotated compared with the Right view. |
Right view |
View window that displays the point cloud in a right section view. The cross section is 90 degree rotated compared with the Front view. |
Section view |
View window that displays the point cloud in a section. The section is aligned to the shape of the group. The depth of the section either includes all points of a group or is defined by switching on the Depth option and typing a depth value in the input field. |
Isometric view |
View window that displays the point cloud in an isometric view. |
Camera view |
View window that displays the point cloud in a camera view. The view can display images that are referenced by an active image list in TerraPhoto. |
Fit view |
If on, the selected group is fit and centered in the view. If off, the view is centered. |
Button 1...4 |
If on, a target class can be selected for classifying the group into another class after inspection. |
Remove |
If on, the selected group is removed from the list in the Inspect Groups list dialog on button press. |
Clean Base |
Show or Do not show the Clean Base button. Use to reclassify tree group points close to ground level. |

2. Define settings and click OK.
This opens another Inspect Groups dialog that contains the list of groups:

3. Select a line in the list of elements.
This centers the selected group in all view windows defined in the tool’s View settings. You can click on the classification buttons of the dialog to classify a group into another target class.
SETTING |
EFFECT |
|---|---|
View / Fields... |
Select the column(s) to show in group list. Available options: •Group id - numeric identifier of the group. •Display color - The active group color if view Display mode set to group based coloring. •Point count - the number of points belonging to the group. •Classes - point class number. •Best match rating - the classification confidence evaluated with By best match routine. •Issue - the validation rule the group did not fulfill. This is available only if using validate groups. •Height - the difference between highest and lowest Z coordinates in the group. •Width - the horizontal width of the group. Width is measured towards the minor axis of the group points. •Length - the horizontal length of the group. Length is measured towards the major axis of the group points, perpendicular to Width. •Radius - the horizontal radius of the group. A descriptive average between Height and Width. •Minimum/Maximum distance - the lowest/highest distance attribute value in the points of the group. •Average amplitude/deviation/intensity/reflectance/reliability - the average value of the point attribute in a point group. •Trunk diameter - the trunk diameter according the circular measurement element. The elements may be created by the Measure Trunk Diameters tool. •Trunk volume - the trunk volume according the circular measure elements. The elements may be created by the Measure Trunk Diameters tool. •Lowest/Highest diameter - the height from ground of the lowest/highest trunk measurement element. •Minimum/Maximum diameter - the diameter of the smallest/largest trunk measurement element for this group. •Diameter span - the percentage of tree height covered with trunk measurements. Percentage value comparing the height between the lowest and the highest trunk measurement, and the complete tree group height. •Diameter count - the number of trunk diameter elements labeling this group. •Worst diameter mismatch - the biggest offset between the drawn circle and the points used by Measure Trunk Diameters process. Emphasize significantly high values setting the Hilite limit tolerance. |
View / Sort... |
Select the attribute to sort the group list. Rows are sorted to the ascending order. The attributes available for sorting are the same as for listing through View > Fields. |
View / Diameters |
View diameter list for the selected group. Opens Diameters dialog listing the trunk diameter measurements for the group. |
Update / Trunk diameters |
Refresh the trunk diameter statistics. Use to update the table after modifying trunk measurement circles. |
Remove |
Removes the selected group from the list. The group itself is not deleted. The button is inactive if Remove is switched on in the tool's Classification action settings. |
<Class> |
Classify group points to the target class. Up to four classification buttons defined in the tool's Classification action settings. The button shows the name of the target class. |
Clean Base |
Exclude ground level points from the group and reclassify the points. Opens separate Clean Base of Tree dialog for specifying action settings. |
Show location |
Select a line in the list, click on the button and move the mouse pointer inside a view window. This highlights the selected group in the view. |
Identify |
Click on the button and identify a group with a data click in a view window. This selects the corresponding line in the list. |
|
Moves one image backward in the active image list and displays the new image in the camera view. This is only visible if a Camera view is set in the tool's View settings. |
|
Click on the button and move the mouse pointer inside a view window. The image closest to the mouse pointer is highlighted. Select an image for the camera view display with a data click. This is only visible if a Camera view is set in the tool's View settings. |
|
Moves one image forward in the active image list and displays the new image in the camera view. This is only visible if a Camera view is set in the tool's View settings. |


