

TerraScan User Guide
Classify Fence
 Classify Fence tool classifies points inside a fence area.
The fence area can be defined by drawing a fence element before starting the tool.
The tool works in top views as well as in section views. The user can define settings for the temporary display of the help lines for the tool.
To classify points inside a fence:
1. Select the Classify Fence tool.
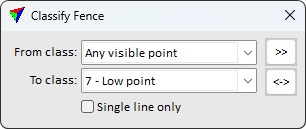
The Classify Fence dialog opens:
2. Define settings.
3. If a fence has been drawn, accept the fence contents with a data click inside the view.
This classifies the points inside the fence.
OR
3. Digitize a fence around the points you want to classify by placing data clicks inside a view. The fence is closed if you place a data click close to the first vertex of the fence.
4. Accept the fence contents with a data click.
This classifies the points inside the fence. You can continue with step 3 if you want to change settings, or with step 4 if you digitize the fence with this tool.
5. Use Save points or Save points As commands in order to save changes to point classes permanently into a laser point file.
SETTING |
EFFECT |
|---|---|
From class |
Source class(es); only points from selected class(es) are effected. The list contains the active classes in TerraScan. Alternatively, points from multiple classes or Any visible point can be classified. |
To class |
Target class into which points are classified. The list contains the active classes in TerraScan. |
|
Opens the Select classes dialog which contains the list of active classes in TerraScan. You can select multiple source classes from the list that are then used in the From class field. |
|
Switches From and To class classes. If From is set to multiple classes or Any visible point, To class is switched to the source class with the lowest class number. |
Single line only |
If on, points from are classified from one line only. The data click accepting the fence must identify a point from the desired line. |

