

TerraScan User Guide
Clip boundaries
Not UAV
Clip boundaries command modifies block boundaries based on a clipping boundary. The clipping boundary can be defined by any shape element drawn in the CAD file. The tool clips off parts of project blocks that are either inside or outside the clipping shape.
The tool does not effect the content or extend of block binary files, if points have been already imported into a project. In addition, the modification effects the project definition loaded in memory. Thus, the project must be saved before the changes are written permanently to the project file. On the other hand, if the result of the clipping action is not satisfactory, the original and unchanged project file can be reloaded.
To clip block boundaries:
1. Select the clipping shape to which block boundaries are clipped.
2. Select Clip boundaries command from the Block pulldown menu.
If blocks contain already points, a message is displayed and informs about the clip action. Close the message with OK.
This opens the Clip Boundaries dialog:
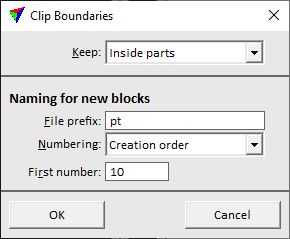
4. Define settings and click OK.
This modifies the block boundaries. An information dialog shows how many blocks have been effect and how many new blocks have been created.
5. Use Save project or Save project as commands in order to save the modification in a project file.
SETTING |
EFFECT |
|---|---|
Keep |
Defines which parts are kept and which ones are clipped off: •Inside parts - block areas inside the clipping boundary are kept. •Outside parts - block areas outside the clipping boundary are kept. |
File prefix |
Prefix for the names of newly created blocks. |
Numbering |
Method of assigning names or name parts to new blocks: •Creation order - automatic numbering increases in the same order as block boundaries have been created. •North to south - automatic numbering increases geographically from north to south and secondarily west to east. •South to north - automatic numbering increases geographically from south to north and secondarily west to east. •West to East - automatic numbering increases geographically from west to east and secondarily south to north. •East to West - automatic numbering increases geographically from east to west and secondarily south to north. The list may further include Block naming formulas that are defined in TerraScan Settings. |
First number |
Number of the first new block to add. This is only considered if a method of automatic block numbering is selected in the Numbering list. |