

TerraPhoto User Guide
Place selection
Place selection command lets you draw a Selection shape by digitizing the shape manually.
The settings for the command depend on the color point mode. The color point mode is selected when the Define color points command is started. See the command’s description or Color points and selection shapes for more information about color point modes.
To place a selection shape for (ortho) rectification:
1. Select Place selection from the Image pulldown menu.
This opens the Place Selection Shape dialog:
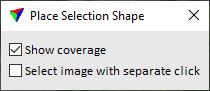
2. Select settings.
3. Digitize a polygon around the area that you want to be covered by a Selection shape.
If the mouse pointer is moved close to the first vertex, the software snaps to this vertex to close the polygon.
4. Accept the selection shape with another data click.
This creates a Selection shape around all pixels inside the polygon.
If Force symbology settings are switched on in Selection shapes of the TerraPhoto Settings, the shape is drawn on the CAD file level using the symbology that is defined for Selection shapes. Otherwise, the shape is drawn on the active level using active symbology settings of the CAD file.
SETTING |
EFFECT |
|---|---|
Show coverage |
If on, areas outside the image are highlighted after the image for being used for the Selection shape is selected. This shows whether the selected image covers the Selection shape area or not. |
Select image with separate click |
If on, the image used inside the Selection shape is defined by a separate data click. If off, the image is defined by the first data click when the digitization is started. |
To place a selection shape for point clouds:
1. Select Place selection from the Image pulldown menu.
This opens the Place Cloud Selection dialog:
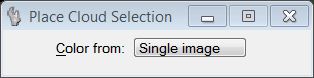
2. Select settings.
SETTING |
EFFECT |
Color from |
Defines from which images the color values are extracted inside the selection shape: •Single image - you select the best image for point cloud coloring. •Multiple images - you select the line from which images are used for point cloud coloring. |
3. Digitize a polygon around the area that you want to be covered by a Selection shape.
If the mouse pointer is moved close to the first vertex, the software snaps to this vertex to close the polygon.
This opens the Selection images dialog:
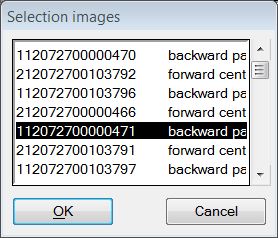
If Single image has been selected in step 2, the dialog shows a list of all images in the active image list that see the location of the selection shape.
If Multiple images has been selected in step 2, the dialog shows a list of cameras per line in the active image list that see the location of the selection shape. Use the Deduce line numbers command in order to get correct line numbers for images.
4. Select an image or camera from the list.
This updates the point cloud coloring according to the selection.
5. If the best image or camera for coloring the points is selected, click OK.
This applies the new image assignment to the laser points.
The placement of a shape vertex can be undone by clicking the reset button during the digitization process.
The Place Selection Shape tool from the Color Points toolbar performs the same action.