

TerraModeler User Guide
Export / Raster image
Not Lite
Raster image command creates image files from a surface model. It can either create an output file for the whole surface model or for the area defined by a selected rectangle. The coloring can be based on the elevation values of a surface model or on elevation differences between two surface models. The images can be created using color depths of 24 bit (true-color), 256 colors, or 8 bit (gray-scale).
To export a raster image:
1. (Optional) Draw and select a rectangle that defines the area of the output file.
2. (Optional) Select a surface model from the list in the Surfaces window.
3. Select Raster image command from the File / Export menu.
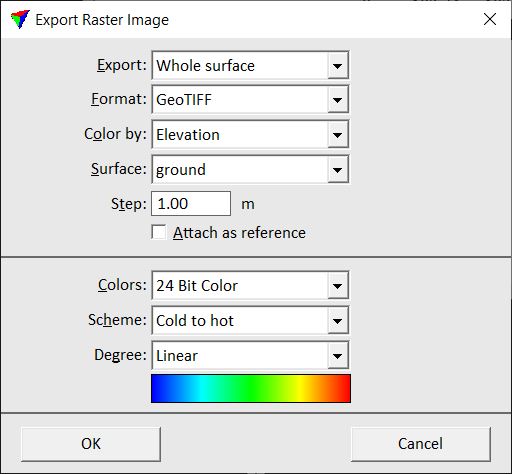
This opens the Export Raster Image dialog:
4. Define settings and click OK.
TerraModeler computes the pixel colors and then opens another Export Raster Image dialog, a standard dialog for saving files.
5. Enter a name for the output file and click OK.
A raster image is created.
Setting |
Effect |
|---|---|
Export |
Area covered by the output file: •Whole surface - the complete surface model is exported. •Selected rectangle - the area defined by a selected rectangle is exported. This is only active if a rectangular shape is selected. |
Format |
File format of the output file: Windows BMP or GeoTIFF. |
Color by |
Attribute used for coloring the output file: •Elevation - coloring based on the elevation values of a surface model. •Vertical difference - coloring based on the vertical difference between two surface models. •Shortest distance - coloring based on the shortest distance between two surface models. •Shaded surface - coloring based on lightning conditions. |
Surface(s) |
Name of the surface(s) to be used for output file creation. If color by is set to Vertical difference or Shortest distance, two surfaces must be selected. |
Step |
Size of each pixel in the output file. |
Attach as reference |
If on, the output file is attached as reference in the CAD file. (Bentley CAD only) |
Colors |
Color depth of the output raster image: •24 Bit Color - true-color image. •256 Colors - 256 colors image. •Grey scale - 8 bit gray scale image. |
Sun azimuth |
Direction from which the sun illuminates the model. Zero is north and angles increase clockwise. Visible only when Color by is set to Shaded surface. |
Sun angle |
Sun angle above the horizon. Visible only when Color by is set to Shaded surface. |
Scheme |
Type of color scheme: •Cold to hot - varies from blue color hues for low values to red color hues for high values. •Hot to cold - varies from red color hues for low values to blue color hues for high values. •Black to white - varies from black for low values to white for high values. Visible only if Colors is set to Gray Scale. •White to black - varies from white for low values to black for high values. Visible only if Colors is set to Gray Scale. •Earth tones - varies between green, yellow, brown, and gray hues with low saturation. Visible only when Color by is set to Shaded surface. •Selected colors - you can define an own coloring scheme. Click on the Define button in order to define a Color scheme for 8 bit color images or a Color scheme for 24 bit color images. |
Degree |
Determines how the color hues are distributed in Cold to hot and Hot to cold color schemes: •Hot, Warm - color hues are shifted to the red-yellow color range. •Very light, Light - color values are shifted to the white color range. Visible only when Colors is set to Gray Scale. •Linear - color hues are linearly distributed. •Dark, Very dark - color values are shifted to the black color range. Visible only when Colors is set to Gray Scale. •Cool, Cold - color hues are shifted to the blue-green color range. |
Color cycles |
Number of color cycles. Use zero to create a gray scale display showing triangle slope only. Visible only when Color by is set to Shaded surface. |
Color scheme for raster image files
The Color Scheme dialog lets you define a color scheme for the raster image export files. The dialog uses the RGB or the HSV color models. The software creates smooth transitions between the colors assigned to the color scheme.
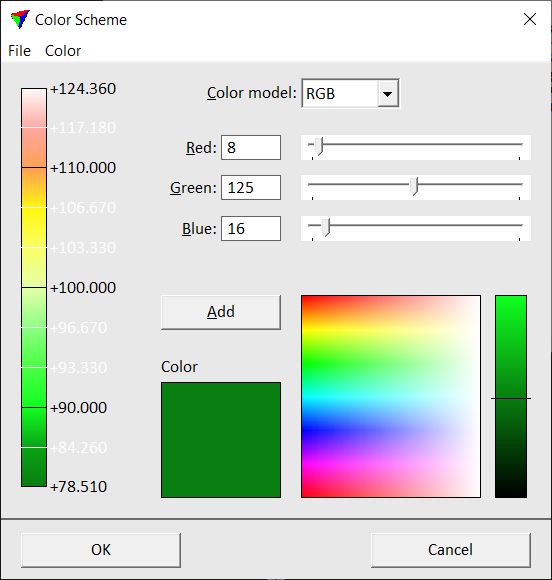
The vertical bar on the left shows all the colors currently assigned in the scheme. Each color boundary has an elevation label displaying the elevation where a smooth color change occurs. The text label is black, if the elevation boundary is fixed. A white text indicates that the elevation boundary has not been fixed and is recalculated if you change the number of colors in the scheme.
From the coloring scheme dialog, you can save a coloring scheme file to a hard disk.
Use menu item |
To |
|---|---|
File / Open |
Open a previously saved color scheme file. |
File / Save As |
Save the color scheme to a file. |
Color / Remove last |
Remove last color from the color scheme. |
Color / Remove all |
Remove all colors from the color scheme. |
To assign a new color:
1. Define the Color model you want to use.
2. Click in the color field on the right at the location of the color you want to add to the color scheme.
OR
2. Define Red Green Blue or Hue Saturation Value values by typing a number or moving the slider. The RGB values can range from 0 to 255, the H value can range from 0 to 359, the SV values from 0 to 100.
This selects the color and adjusts the values in the RGB or HSV fields. The selected color is displayed in the Color field.
3. Click Add in order to add the selected color to the color scheme.
The color is added to the lower end of the bar, thus, the first selected color is assigned to the highest elevation values.
To fix an elevation boundary:
1. Click on the text label of the elevation boundary.
This opens the Color Elevation dialog
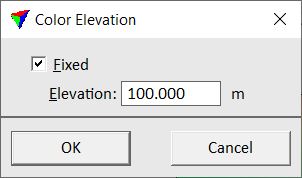
2. Switch Fixed on and enter an Elevation value on which to fix the color transition.
3. Click OK.
This recalculates the other elevation boundaries according to the fixed elevation value.
To create a new color scheme:
1. Select Remove all command from the Color pulldown menu in the Coloring scheme dialog.
This removes all assigned colors from the current color scheme.
2. Assign new colors to the color scheme as described above.
3. (Optional) Save the color scheme as a file on a hard disk using the Save as command from the File pulldown menu in the Color Scheme dialog.