

TerraScan User Guide
Place Tree Cell
Not Spatix
 Place Tree Cell tool lets you place a tree cell manually. The cell placement requires the following preparation steps:
•Creation of 3D cell elements in a Bentley cell library. A tree cell should represent the stem and the crown of a tree. An example library is provided with the TerraScan installation. The library is stored in the \cell folder of the Terra applications installation directory, for example C:\terra64\cell\karttali.cel. It can be used, for example, to test the tools of the Trees toolbox.
•Definition of tree species and usage of cells in Tree species category of TerraScan Settings.
•(Optional) Classification of ground in the point cloud.
A tree cell can be placed, for example, based on a vertical section view of a tree in a point cloud. The base point of the tree can be fixed to the ground elevation if the ground is classified in the point cloud.
To place a tree cell manually:
1. Select Place Tree Cell tool.
This opens the Place Tree Cell dialog:
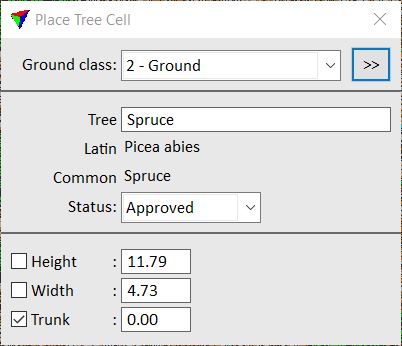
2. (Optional) Select a Ground class.
3. Start typing the common or Latin name of a tree species in the Tree field.
4. Define additional settings in the Create Tree Cell dialog, if necessary.
5. Define the base point of the tree cell with a data click in a top or section view.
If the data click is placed in a another view than a section view (typically in a top view), the base point elevation is fitted to the given Ground class(es) and the XY location is defined by the data click. If the data click is placed in a section view, the base point elevation is determined by the data click and the XY location by the center of the vertical section.
6. Move the mouse pointer inside a section view.
The height of the tree cell is dynamically displayed.
7. Define the highest point of the tree cell with a data click in a section view.
The width of the tree cell is dynamically displayed.
8. Define the width of the tree cell with a data click in a top or section view.
The trunk width of the tree cell is dynamically displayed.
9. Define the trunk width of the tree cell with a data click in a section view.
The software places the cell element according to the settings for tree species.
SETTING |
EFFECT |
|---|---|
Ground class |
Point class(es) that may define the base point of a tree. |
|
Opens the Select classes dialog which contains the list of active classes in TerraScan. You can select multiple source classes from the list that are then used in the Ground class field. |
Tree |
Tree species. Start typing the common or Latin (scientific) name of a tree species. If the name is found in Tree species category of TerraScan Settings, the Latin and Common names are displayed after you typed a few characters. |
Status |
Sets the status of the tree cell: Check or Approved. The status flag is used by the Modify Tree Cells tool. |
Height |
If on, the height of the tree cell is fixed to the given value and can not be changed dynamically anymore. |
Width |
If on, the width of the tree cell is fixed to the given value and can not be changed dynamically anymore. |
Trunk |
If on, the trunk width of the tree cell is fixed to the given value and can not be changed dynamically anymore. |

Tree cells can be placed in a more automatic way by using the Create Tree Cells tool.