

TerraScan User Guide
Modify Tree Cells
Not Spatix
 Modify Tree Cells tool lets you check and modify tree cell elements that have been placed with the Create Tree Cells tool. The tool opens a list of selected tree cells. Based on the list, you can display the tree cells, check their attributes and size, and possibly modify the tree species name and the cell's height, width, and trunk width. You can also move the cell completely to another location.
The work can be supported by images. This requires a mission and image list in TerraPhoto. More information can be found in the TerraPhoto User Guide.
For displaying a selected tree, the tool supports automatic display update in three CAD file views, one top view, one section view, and one camera view. Images can be displayed in the camera view.
The list shows a flag for each tree. By default, the flag is set to Check. After you checked a tree, you may change it to Approved.
To merge two point groups:
1. Select tree cells with any Selection tool.
2. Select Modify Tree Cells tool.
This opens the Tree View Settings dialog:
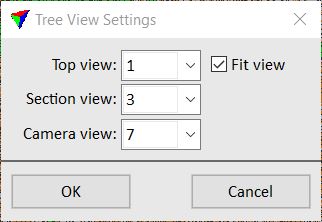
3. Select CAD file views in which you want to display the tree cells and click OK.
This opens the Modify Trees dialog:
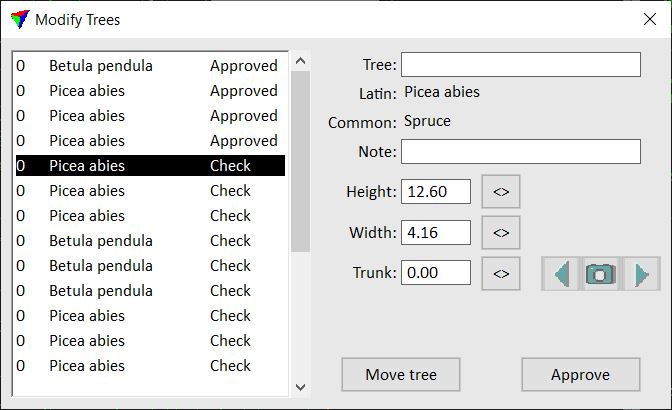
The dialog contains a list of all selected tree cells. For a selected tree in the list, the attributes are shown on the right side of the dialog.
SETTING |
EFFECT |
|---|---|
Tree |
Tree species. Start typing the common or Latin (scientific) name of a tree species. If the name is found in Tree species category of TerraScan Settings, the Latin and Common names are displayed after you typed a few characters. |
Note |
Free text field for adding a note to a tree. |
Height |
Height of the tree represented by the cell height. You can change the height by typing a new value or using the button right of the field. |
Width |
Width of the tree crown represented by the cell width. You can change the width by typing a new value or using the button right of the field. |
Trunk |
Width of the tree trunk at its base point. You can change the width of the trunk by typing a new value or using the button right of the field. |
|
Activates the manual modification of the cell. After clicking the button, move the mouse pointer into a top or section view. The extend of the tree is dynamically displayed. Define the new height, width, or trunk width with a data click. |
|
Click on the camera button in the middle of the button group in order to identify an image for display. Move the mouse pointer into a view. The image footprint closest to the mouse pointer is dynamically displayed. Select an image for display with a data click. Click on the arrow buttons left and right in the button group in order to select the previous or next image from the currently displayed image in the images list. |
Move tree |
Moves the tree cell to another location. After clicking the button, move the mouse pointer into a top or section view. The cell of the tree is dynamically displayed at the mouse pointer location. Define the new location with a data click. |
Approve | Set to check |
After checking a tree cell and possibly modifying it, click on the Approve button. This changes the status of the selected model to Approved. If an approved tree is selected in the list, the button changes to Set to check. Click on the button in order to change the status of the selected model to Check. |

