

TerraScan User Guide
Place Paint Marking
 Place Paint Maring tool can be used for the digitization of paint markings, such as arrows or parking lot drawings on a road. The tool supports the placement of standard shapes for the paint markings. It relies on paint marking templates that are defined in the Road paint markings / Paint markings category of TerraScan Settings.
In semi automatic mode the user defines the approximate origin point of the marking, and the software detects the marking template, orientation and accurate position. Alternatively, in manual approach, the user can define the template to use, origin and rotation. Then, the software places the drawing as defined in the template.
To place a paint marking drawing:
1. Select the Place Paint Marking tool.
The Place Paint Marking dialog opens:
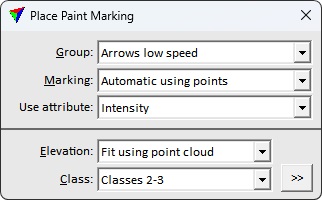
2. Select the Group of the paint marking and define settings.
3. Place the origin point of the paint marking with a data click.
The shape the selected Marking or of the first paint marking in the Group as defined in the Settings is displayed at the given location.
If Marking selection was set to Automatic using points or ortho, the software draws the marking element to the CAD file automatically.
4. If Marking is set to Choose with mouse click, move the mouse pointer. The shapes of the different marking templates of the group are shown at the origin location as you move the mouse. When the correct template is shown, place a data click in order to confirm the template.
5. Move the mouse pointer in order to rotate the template.
6. Place another data click in order to confirm the paint marking drawing.
This draws the paint marking as cellBentley CAD/symbolSpatix element in the CAD file. You can drop and modify the element using CAD tools.
SETTING |
EFFECT |
|---|---|
Group |
Name of the paint marking group. The list includes all groups defined in the Paint markings category of TerraScan Settings. |
Marking |
Name of the paint marking template to draw: •Automatic using points - the application detects and positions the marking automatically using loaded points. •Choose with mouse click - the paint marking is defined by moving the mouse after placing the origin point. This makes the template selection flexible if you do not know the exact name of a paint marking. •<name> - name of a paint marking template as defined in the Paint markings category of TerraScan Settings. |
Use attribute |
Select the point attribute to use in the automatic template matching. Available alternatives are Intensity and Color. Available only if Marking is set to Automatic using points. |
Elevation |
Determines how the Z value for the crosswalk drawing is defined: •Mouse click - the current mouse pointer elevation is used. This results in a 2D-like drawing. •Fit using point cloud - a single plane equation is used to fit the crosswalk drawing to the point cloud. This results in a 3D-like drawing. •<surface model> - a single plane equation is used to fit the crosswalk drawing to a surface model loaded in TerraModeler. This results in a 3D-like drawing. |
Class |
Point class(es) from which to derive the elevation of the drawing. This is active only if Elevation is set to Fit using point cloud. |
|
Opens the Select classes dialog which contains the list of active classes in TerraScan. You can select multiple source classes from the list that are then used in the Class field. |
