

TerraPhoto User Guide
Orthophoto Production
TerraPhoto is commonly used for creating a seamless, positionally accurate orthophoto mosaic as the final product. Many steps in the TerraPhoto workflow prepare a data set for this aim. The rectification itself is an automatic process.
There are typical settings that you would use for producing orthophotos of two different quality levels. “Quick” orthophotos may be produced for internal purposes only. “Final” orthophotos are the actual end product that is delivered to the customer. These two levels of orthophotos are produced by selecting different parameters for the rectification process.
The creation of an orthophoto mosaic requires tiles which represent the orthophoto boundaries. Tiles can be produced by Place tile array command or Place Tile Array tool in TerraPhoto, or by any CAD platform tool that produces rectangular shapes. The rectification is started by the Rectify mosaic command from the Rectify pulldown menu in TPhoto window.
Settings for quick orthophotos
It is often useful to create orthophotos in a fast way for internal use before all the work for best-quality orthophotos is completed. This is done, for example, to use orthophotos in the background for the manual editing of laser data classification. Accurate orthophotos require a correct ground model but the correct classification of ground laser points is often difficult to achieve without some imagery in the background of the point cloud.
Quick orthophotos are produced based on a ground model from automatically classified laser points and roughly adjusted raw images. There is no need to take too much effort for improving the positioning of raw images or to involve color corrections and selection shapes in the production of quick orthophotos.
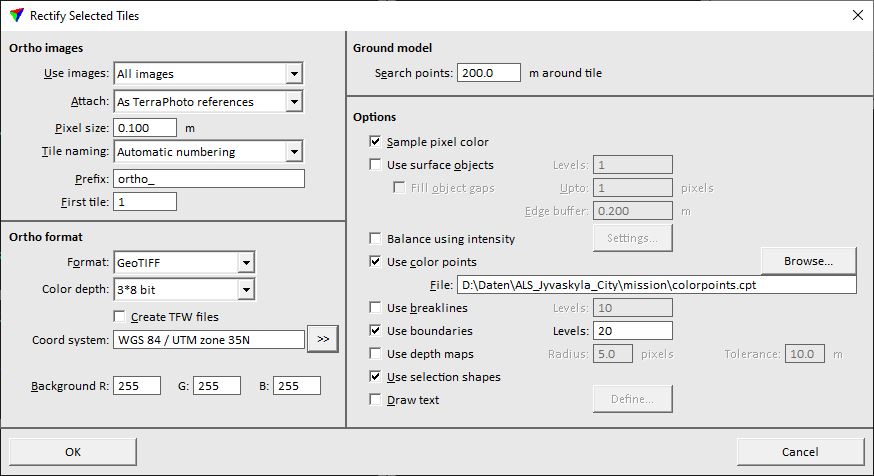
The recommended settings for quick orthophotos are reduced to a minimum in order to save processing time. Only Sample pixel color is switched on in the Options group of the Rectify Selected Tiles dialog. Additional settings would produce better-quality results but they would also slow down the rectification process and require more processing steps in preparation.
Settings for final orthophotos
Orthophotos produced as end products for delivery require more processing steps and input information. This includes a correct ground model, accurate positioning of the raw images, color corrections, selection shapes, and possibly 3D vector models of objects on the surface or depth maps for producing true-orthophotos.
Typical settings for final orthophotos include more options used in the Options group of the Rectify Selected Tiles dialog. They make the rectification process slower but result in better-quality orthophotos.
Format is set to GeoTIFF which results in raster files without any loss of quality caused by compression.
Use surface objects makes use of closed shapes that are drawn on the given CAD file levels. It produces true-orthophotos where the shapes are utilized to get the correct position of objects above the ground, such as building roofs and bridges. Alternatively, Depth maps may be used for the same purpose. The production of true orthophotos requires a lot of overlap between the raw images.
Use color points defines a Color points file. The file contains color balancing information in order to eliminate brightness and color differences between neighboring images. A similar effect may be reached by utilizing the Balance using Intensity option, expecially for mobile images seeing mostly the road surface.
Use selection shapes involves all types of Selection shapes stored in the CAD file. Selection shapes manipulate seamlines between images or define the usage of certain raw images in specified areas.