

TerraPhoto User Guide
Compute list
Not Lite
Compute list command creates an image list from time-stamped trajectory information and system-specific image list files. The application derives the corresponding xyz position and orientation angles for each image from the trajectory. If there is already an active image list in TerraPhoto, the new entries are added to the active list.
This command requires that trajectories are imported first by using the Manage Camera Trajectories tool. In most cases, the image list is computed for one camera at a time. Therefore, the steps have to be repeated several times in order to add images from multiple cameras to the image list.
The image information can be provided in different ways:
•Image timing files - time of image capture and name of each image are stored space- or tab-separated columns in a text file.
•Event + naming file - time of image capture and an event number are stored in one text file, event number and image name are stored in another text file.
•Lynx survey file - specific text file from the Optech Lynx system.
•Riegl csv files - specific text files from the Riegl system.
•Trimble MX8 dbf files - specific dbf files from the Trimble MX8 system.
The command can utilize a selected shape for bounding an area. Only images for which the xyz position is located inside the boundary are added to the image list.
To compute an image list from image timing files:
1. (Optional) Draw and select a shape around the area for which to add images to the image list.
2. Select Compute list command from Images pulldown menu.
This opens the Compute List dialog:
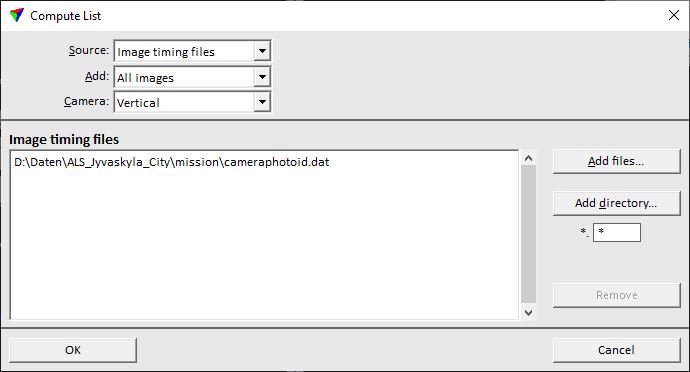
3. Select the source file format in the Source list.
4. Select whether to add all images from the selected source file or only image inside a selected shape.
The following settings depend on the selected source file format.
Image timing files, Riegl csv files
5. Select the camera in Camera field for which the input files apply.
6. Click on the Add button to add image timing files to the list.
OR
6. Click on the Add directory button to add all text files from a directory to the list.
This opens the Image timing files/directory dialog, a standard dialog for opening files/folders.
7. Define the text file(s)/folder and add them to the list in the Compute list dialog.
8. Click OK.
The software links each image timing file with the trajectory information using the time stamps. For each image, the positional and orientation information is derived and added to the image list.
9. Select Save list or Save list As commands from the Images pulldown menu in order to save the image list file.
Event + naming files
5. Select the camera in Camera field for which the input files apply.
6. Click on the Add files button to add event files to the list.
This opens the Event files dialog, a standard dialog for opening files.
7. Define the text file(s) and add them to the list in the Compute list dialog.
8. Click on the Add files button to add image name files to the list.
This opens the Image naming files dialog, a standard dialog for opening files.
9. Define the text file(s) and add them to the list in the Compute list dialog.
10. Click OK.
The software links each image naming file to the corresponding event file using the event number. Then, the event file is linked with the trajectory information using the time stamps. For each image, the positional and orientation information is derived and added to the image list.
11. Select Save list or Save list As commands from the Images pulldown menu in order to save the image list file.
Lynx survey files
5. Click on the Add button to add the survey-specific text files to the list.
OR
5. Click on the Add directory button to add all text files from a directory to the list.
This opens the Image timing files/directory dialog, a standard dialog for opening files/folders.
6. Define the text file(s)/folder and add them to the list in the Compute list dialog.
7. Click OK.
The software reads the positional and orientation information for each image from the survey file and adds it to the image list.
8. Select Save list or Save list As commands from the Images pulldown menu in order to save the image list file.
Trimble MX8 dbf files
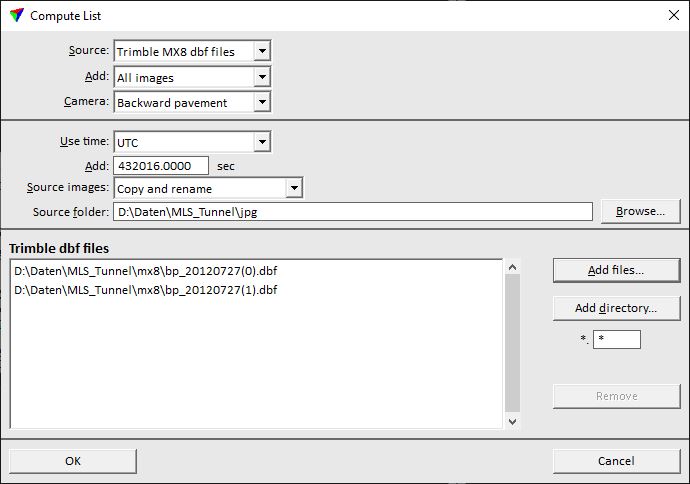
5. Select a camera in Camera field for which the input files apply.
6. Select the time stamp format that is used in the source files.
7. Define a number of seconds to be added to the time stamps.
8. Define a method of handling the Source images.
Source images are renamed during the image list computation in order to make their naming unique over all cameras.
9. Define the Source folder, where images are stored. The images can be stored in several sub-folders within the source folder.
10. Click on the Add button to add .dbf files to the list.
OR
10. Click on the Add directory button to add all .dbf files from a directory to the list.
This opens the Image timing files/directory dialog, a standard dialog for opening files/folders.
11. Define the .dbf file(s)/folder and add them to the list in the Compute list dialog.
The file names of the .dbf files also define the name of sub-folders the software checks for source images.
12. Click OK.
The software links each image timing file with the trajectory information using the time stamps. For each image, the positional and orientation information is derived and added to the image list.
13. Repeat steps 5 to 12 for all cameras for which to add images to the image list.
14. Select Save list or Save list As commands from the Images pulldown menu in order to save the image list file.