

TerraPhoto User Guide
Add
Add command lets you add a new color point manually.
To add a new color point:
1. Select Add command from the Point pulldown menu.
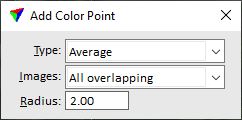
This opens the Add Color Point dialog:
2. Select settings for the new color point.
3. Enter the position of the color point with a data click inside a view.
4. Update the view using the CAD platform tool in order to make color changes visible.
5. Save the color points using Save or Save As commands from the File pulldown menu in order to save the color points into a file.
SETTING |
EFFECT |
|---|---|
Type |
Type of the color point: •Average - intensity and color values are averaged at the location of the color point. •Grey average - color values are balanced in order to get the averaged gray value. •Fixed - values for hue, saturation and value can be set manually. See Edit for more information. •Reference - colors from reference images are use for target color calculation. Requires an image attached as TerraPhoto reference at the location of color point. |
Images |
Defines what images are included in the color point computation: •All overlapping - all images that see the color point location. •Assigned only - only images which contribute to orthophoto pixel colors inside the color point radius. If the color point is placed at the seamline of two images, only those two images are used to compute the target color. This may exclude unwanted coloring effects from more distant images. •Upto 2 ... 6 closest - up to the given number of images closest to the color point location. •Select in dialog - images can be chosen in a dialog. See Edit command for more information. |
Radius |
Size of the color point. Defines the area that is used for computing a color point’s intensity and RGB values. |
The Add Color Point tool from the Color Points toolbar performs the same action.