

TerraScan User Guide
Apply Plane Symmetry
 Apply Plane Symmetry tool forces plane equations, normal directions and/or slope gradients of planar roof patches to match. The symmetry adjustment requires that at least two patches are selected. However, the tool is also applicable to more than two patches in one step.
To apply plane symmetry:
1. Select Apply Plane Symmetry tool.
The Apply Plane Symmetry dialog opens:
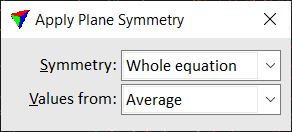
2. Select settings.
3. Move the mouse pointer inside a view.
A patch is highlighted if the mouse pointer is inside.
4. Define the first roof patch with a data click.
If Values from is set to First patch, this patch determines the symmetry change for the other patches.
5. Define the next roof patch with a data click.
Repeat step 5 for all patches that you want to include in the symmetry adjustment.
6. Confirm the patch selection with another data click inside one of the selected patches.
This applies the symmetry to all selected patches.
SETTING |
EFFECT |
|---|---|
Symmetry |
Determines the symmetry value that is enforced for all selected roof patches: •Whole equation - the plane equation is recomputed and selected patches are adjusted accordingly. Symmetric planes have the same plane equation. •Direction & Slope - normal direction and slope gradient are adjusted. •Direction - the normal direction of a plane is adjusted. Symmetric planes have normal directions that differ by 90 degree. •Slope - the slope of a plane is adjusted. Symmetric planes have mirrored slope gradients. |
Values from |
Defines how the new values for roof patches are derived: •Average - the values of all selected patches are averaged. •First patch - the value of the first selected patch is used for all selected patches. |