Rectify textures
Not Lite
Rectify textures command starts the production of texture files. Wall textures can be created from oblique images of an airborne system or from side-looking images of a ground-based mobile system. Roof textures should be created from vertical images of an airborne system. The textures are created as raster files which are used when a view is rendered with Display Rendered View tool in TerraPhoto.
The process requires the selection of 3D building vector models prior to starting the command. The vector models can been created, for example, with TerraScan tools for building vectorization.
The software decides what image to use for a model polygon based on the viewing direction and percentage of wall/roof area seen by the image. Depth maps created in TerraPhoto can support the creation of wall textures. See Compute depth maps for more information about depth maps.
To create textures:
1. Use any Selection tool of the CAD platform in order to select 3D vector models of buildings.
2. Select Rectify textures command from the Rectify pulldown menu.
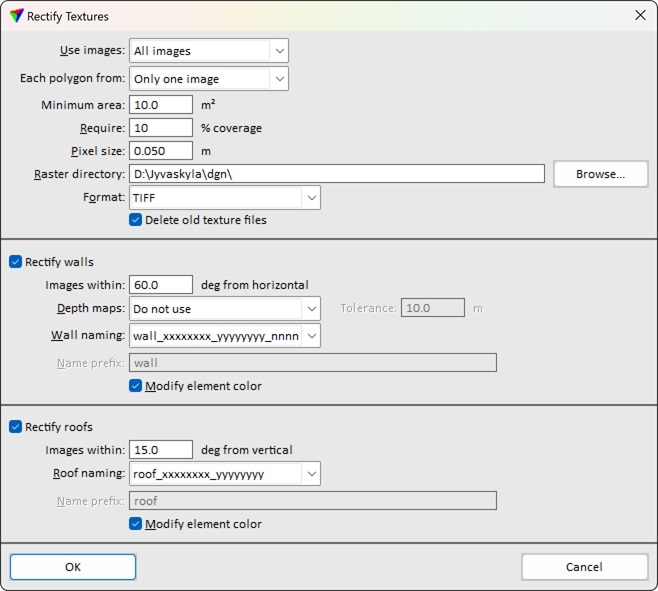
This opens the Rectify Textures dialog:

3. Define settings and click OK.
This starts the rectification process. The software produces raster file(s) for each selected wall and/or roof polygon.
4. Save the CAD file and the CAD file settings (Bentley CAD only) in order to save the references to the texture files.
SETTING |
EFFECT |
|---|---|
Use images |
Raw images to use: All images or Selected. Alternatively, the name of one camera can be selected from which to use the images. |
Each polygon from |
Defines the amount of images that are used for creating a texture for a polygon: •Only one image - the best image is used. •Upto two|three|four best - up to two|three|four best images are used. •Any number of images - any amount of images can be used. |
Minimum area |
Smallest area for which the software creates a texture file. |
Require |
Minimum percentage of a wall polygon or roof area that an image must cover in order to be considered for texture creation. |
Pixel size |
Pixel size of the textures. |
Raster directory |
Directory for storing the texture files on a hard disk. For successful rendering in TerraPhoto, the storage location must be the same where the CAD file is stored. |
Format |
Raster file format to produce: BMP, JPG, or TIFF. |
Delete old texture files |
If on, existing texture images assigned to selected elements are removed. If off, old texture files remain, unless new texture name is same and files are overwritten. |
Rectify walls |
If on, wall textures are created. |
Images within |
Limit for the viewing angle of an image that is considered for wall texture creation. |
Depth maps |
Method of using depth maps in the rectification process: •Do not use - depth maps are not used. •Image selection - the best image(s) are used even if there are obstructing objects in the image(s). •Selection and obstruction - an image is not used if there are obstructing objects in the image. This may result in blank areas for walls. |
Tolerance |
Distance from a wall in depth maps within which objects in front of the wall are ignored. This is only active if Depth maps are used. |
Wall naming |
Method for naming the wall texture files: •wall_xxxxxxxx_yyyyyyy_nnnnn - wall_<easting>_<northing>_<number>. This is the recommended method. Coordinate values represent the location of whole building model when texturing building vectorized with TerraScan. •namennnnn - increasing number. |
Name prefix |
Text to add before an increasing number for naming the wall texture file. This is only active if Wall naming is set to namennnnn. |
Modify element color |
If on, the color of the wall shape in the 3D model is changed to the average color of the texture pixels. |
Rectify roofs |
If on, roof textures are created. |
Images within |
Limit for the viewing angle of an image that is considered for roof texture creation. |
Roof naming |
Method for naming the roof texture files: •roof_xxxxxxxx_yyyyyyy_nnnnn - wall_<easting>_<northing>_<number>. This is the recommended method. •namennnnn - increasing number. |
Name prefix |
Text to add before an increasing number for naming the roof texture file. This is only active if Wall naming is set to namennnnn. |
Modify element color |
If on, the color of the roof shape in the 3D model is changed to the average color of the texture pixels. |