

TerraPhoto User Guide
Installation
Terrasolid applications may be delivered as a zip file or on a USB-Stick. The installation package of Terrasolid applications for Spatix includes the setup for Spatix itself as well. Therefore, you can install Spatix and Terrasolid software in one step.
A zip package contains the software - it does not include the User Guides. This is the normal delivery method of the software if you download it from the Terrasolid website.
A USB-Stick may include the User Guides in PDF format in addition to the installation files. The USB-Stick may further include versions for multiple environments. You choose the version which corresponds to your operating system and platform version. You install Terrasolid software from an USB-Stick probably only if you participate in a training event.
Terrasolid applications for Bentley products and Spatix may be installed on the same computer and run parallel. The applications should be installed in the same directory (e.g. c:\terra64). This enables the use of the same configuration files, settings, etc. for both platforms.
To install TerraPhoto from a zip file together with or on top of Spatix:
1. Unpack the zip archive with any zip file manager.
2. Start SETUP.EXE which is part of the zip archive. You must have administrator permissions in order to run setup successfully.
The installation program tries to determine where Spatix has been installed and opens the Terra Setup dialog:
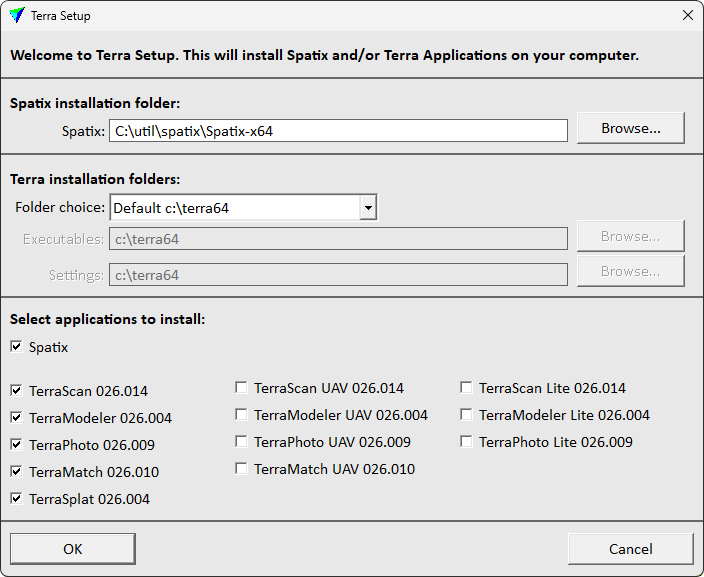
3. Check and possibly change the installation folder of Spatix. Click on the Browse button next to the input field in order to select a new installation folder for Spatix. The folder is created automatically, if it does not exist.
4. Define the installation folder(s) where to install TerraPhoto and other Terra applications.
The default Folder choice is Default c:\terra64. This installs all executables and setting files into the same folder c:\terra64. The folder is created automatically, if it does not exist.
As an alternative, if executables and settings files need to be separated, select another Folder choice:
•Default 'Program files' - executables are installed into c:\program files\Terrasolid, setting files are installed into C:\TERRA64.
•Freely selectable folders - the user defines a folder for Executables and Settings in the corresponding input fields. Click on the Browse button next to each input field in order to select a folder.
5. Select all Terrasolid applications that you want to install.
Select either the full version, the UAV version or the Lite version of an application. The versions do not run parallel on the same CAD platform.
6. Click OK to start the installation.
A message is displayed when the installation is finished.
Install all Terrasolid applications into the same folder(s) in order to ensure interaction between the applications without trouble.
To install TerraPhoto from a zip file on top of any Bentley product:
1. Unpack the zip archive with any zip file manager.
2. Start SETUP.EXE which is part of the zip archive.
This may open a dialog confirming the execution of SETUP.EXE and/or prompting for the administrator password.
The installation program needs to know where the Bentley product (MicroStation, Map PowerView or any other compatible product) has been installed. It automatically searches all local hard disks to find the Bentley installation directory.
The installation dialog opens:

The dialog is the same for all Bentley products and Terra applications. The labels in the dialog always refer to "MicroStation", no matter what Bentley product is used.
3. Check the MicroStation directory. Replace the path if the correct location was not found automatically.
4. Define the installation folder(s) where to install TerraPhoto and other Terra applications.
The default Folder choice is Default c:\terra64. This installs all executables and setting files into the same folder c:\terra64. The folder is created automatically, if it does not exist.
As an alternative, if executables and settings files need to be separated, select another Folder choice:
•Default 'Program files' - executables are installed into c:\program files\Terrasolid, setting files are installed into C:\TERRA64.
•Freely selectable folders - the user defines a folder for Executables and Settings in the corresponding input fields. Click on the Browse button next to each input field in order to select a folder.
5. Select all Terrasolid applications that you want to install.
Select either the full version, the UAV version or the Lite version of an application. The versions do not run parallel on the same CAD platform.
6. Click OK to start the installation.
A message is displayed when the installation is finished.
Install all Terrasolid applications into the same folder(s) in order to ensure interaction between the applications without trouble.
The installation folder contains a README.TXT file which explains the installation of the software in batch mode. The allows to install several Terrasolid applications in one step.
To install TerraPhoto from USB-Stick on top of a Bentley product:
The process is the same for all Bentley products. The labels in all dialogs always refer to "MicroStation", no matter what Bentley product is used.
1. Insert the USB-Stick.
2. Locate the correct installation directory on the stick.
3. Start SETUP.EXE from that directory.
The installation program tries to determine where MicroStation has been installed and opens the Terra Setup dialog.
4. Define the directory where to install TerraPhoto and maybe other Terra applications.
The default path is C:\TERRA64. You can change this to another location. The specified directory is created automatically, if it does not exist.
5. Check the MicroStation directory. Replace the path if the correct location was not found automatically.
You can use the Scan button to automatically search the hard disk for the Bentley CAD installation. Alternatively, you can use the Browse button to locate the Bentley CAD platform installation folder yourself.
6. Click OK to continue.
This opens another Terra Setup dialog.
7. Select the TerraPhoto for MicroStation item in the dialog.
You may select all applications for which you have installation files.
8. Click OK to start the installation.
A message is displayed when the installation is finished.