

TerraMatch User Guide
Find Match
 Find Match tool analyzes the mismatch in laser data and solves for correction parameters. The tool utilizes the surface-to-surface matching method described in Find match vs. Tie Lines.
You can run Find Match either on points loaded into TerraScan or on a TerraScan project. When running on a project, TerraMatch automatically scans through all project blocks during one iteration round.
Before you run Find Match, you must have performed a number of pre-processing steps which can be outlined as follows:
•Import trajectories into TerraScan.
•Split any trajectories which overlap themselves.
•Import time-stamped laser points into TerraScan.
•Make sure that strip numbering of laser points matches trajectory numbers.
•Classify low points.
•Classify ground separately for each strip.
•(Optional) Classify ground to another class in places which are best suited for comparison.
•(Optional) Classify buildings.
•(Optional) Smoothen ground surface if most of it is asphalt or some other hard surface.
You can select the classes which to use in surface-to-surface comparison and how much weight to apply to each class. This makes it possible to manually classify locations which have sloped surfaces and to apply a higher weight value to those classes.
You may choose from the following strategies:
•Use ground points only and use High weight value for ground.
•Use good surfaces only. Classify suitable locations manually to Building class or Sloped ground class. Use High weight value for the classes.
•Use both ground points and good surfaces. Classify suitable locations manually. Apply High weight value to those classes and Low or Medium weight to ground class.
General procedure to find correction parameters:
1. Select the Find Match tool.
This opens the Find Match dialog:
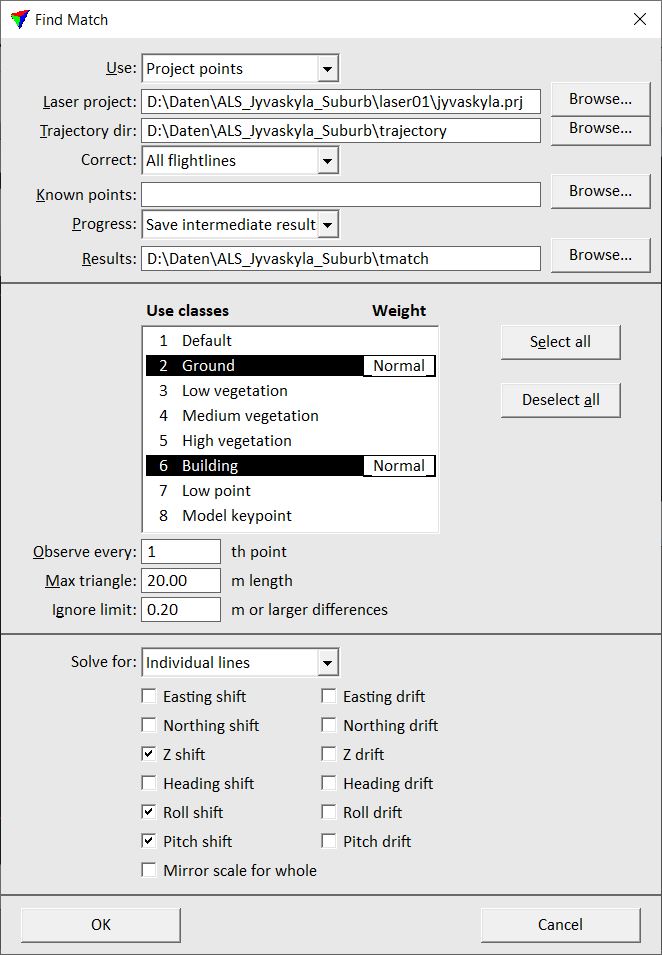
2. Define settings and click OK.
Setting |
Effect |
|---|---|
Use |
Points to use in comparison: Loaded points or Project points (not UAV). |
Laser project |
TerraScan project file which defines the blocks to use in comparison. Selectable only when Use is set to Project points. |
Trajectory dir |
Directory containing TerraScan trajectory files. |
Correct |
Quality of trajectories to correct. This allows you to keep better quality trajectories as fixed and compute corrections for lower quality trajectories only. |
Known points |
Optional text file containing known points. |
Progress |
If set to Saving intermediate results, the software saves the solution values after each iteration. |
Results |
Path to the file for saving intermediate results. This is only active when Progress is set to Save intermediate results. |
Use classes |
Classes to use for comparison and weight factors to apply. |
Observe every |
How many points to make an observation with. Use 1 for small data sets and a bigger value (2-5) for large data sets. |
Max triangle |
Maximum length of a triangle created for the surface-to-surface comparison. |
Ignore limit |
Limit value for differences between strips that the software tries to match. The values should be a bit higher than the largest mismatch between strips. Larger mismatches are treated as gross errors and therefore not included in the calculation. |
Solve for |
Type of solution to find: •Whole data set - one value per selected correction to apply to the whole data set. •Individual lines - separate correction values for each strip per selected correction. |
Easting shift |
Solves for a constant easting correction value. |
Northing shift |
Solves for a constant northing correction value. |
Z shift |
Solves for a constant elevation correction value. |
Heading shift |
Solves for a constant heading correction value. |
Roll shift |
Solves for a constant roll correction value. |
Pitch shift |
Solves for a constant pitch correction value. |
Mirror scale for whole |
Solves for a mirror scale factor. Always solved for the whole data set, no matter what type of solution is selected in the Solve for list. |
Easting drift |
Solves for easting correction which changes linearly by time. |
Northing drift |
Solves for northing correction which changes linearly by time. |
Elevation drift |
Solves for elevation correction which changes linearly by time. |
Heading drift |
Solves for heading correction which changes linearly by time. |
Roll drift |
Solves for roll correction which changes linearly by time. |
Pitch drift |
Solves for pitch correction which changes linearly by time. |
The application runs through a number of iterations which may last anything from a few seconds to several hours depending on the size of the data set. When the iteration has converged, the Apply results dialog opens:
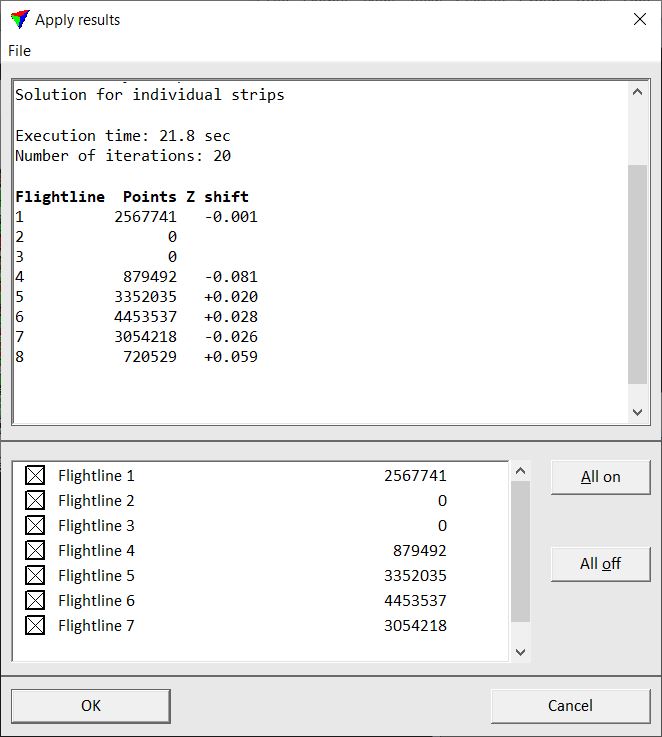
3. View the report and optionally store it as a text file.
4. Save a corrections file by using the Save corrections command from the File pulldown menu. This enables the application of the corrections later using the Apply Correction tool. This is the recommended workflow.
5. Click Cancel to close the dialog without applying the corrections directly.
OR
3. Check all strips to which you want to apply the correction in the lower list box.
4. Click OK to apply the corrections directly.
When using a project, you should set the directory into which the output files are written. When using loaded points, corrections are applied to the loaded points in memory.