

TerraPhoto User Guide
Change Texture Image
 Change Texture Image tool lets you interactively change the raw image used for creating a wall texture. The tool opens a list of raw images which cover a selected building wall. From this list, you can select a raw image from which you want to create a texture.
The tool requires that textures files are already available. A new texture file overwrites the existing texture file for this wall.
The tool’s dialog contains a Save All button which can be used to save texture files from all available images for a wall into a folder. The folder is created as sub-directory of the folder in which the original texture files are stored. It is named with the prefix IMAGES_ and the name of the original wall texture, for example IMAGES_WALL0005681 for all possible texture files of WALL0005681.TIF. This may be useful, if you need to merge different parts of a wall from several images in order to get one texture file that covers the wall completely. In this case, you can use any image processing software for merging the different parts of the wall and then, replace the original texture file.
As an alternative to a wall texture from images, the tool lets you define a constant color which is then used to fill the texture of a wall. This may result in a better representation if no image sees the wall properly.
To change a texture image interactively:
1. Select Change Texture Image tool.
2. Identify the wall for which to change the texture with a data click.
3. Accept the selection with another data click.
This opens the Change Texture Image dialog:
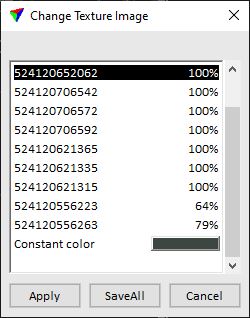
4. Select an image from the list of raw images in the dialog.
This displays the wall texture created from the selected image. In addition, all building models are rendered using existing textures.
5. Choose the raw image from which you want to create the wall texture.
6. Click Apply.
This creates the new texture file. You can continue with step 2.
To apply a constant wall color interactively:
1. Follow steps 1-3 from the workflow above.
2. Select Constant color in the Change Texture Image dialog.
The software automatically selects the line color of the wall as fill color.
3. To change the color, click on the color field.
This opens the Color dialog, the standard Windows dialog for selecting a color.
4. Select a color and click OK.
5. Click Apply to the Change Texture Image dialog.
This applies the color to the wall.