

TerraPhoto User Guide
Change Image Rectify Setting
 Change Image Rectify Setting tool changes the status of an image between active and inactive. An inactive image is still present in the image list but is excluded from the orthorectification process. The image status is saved in the image list.
The tool is useful, for example, for testing which images can be deleted from the image list without causing a gap or to exclude images from the ortho mosaic while keeping them as part of the tie point solution.
To change image active setting:
1. Select the Change Image Rectify Setting tool.
This opens the Change Image Rectify Setting dialog:
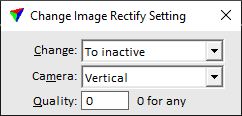
2. Select settings.
3. Move the mouse pointer inside a CAD file view.
The image footprint closest to the mouse pointer location is shown. An active image footprint is displayed with continuous lines while an inactive image footprint is displayed with dashed lines.
4. Switch the image status between active and inactive with data clicks inside the image footprint.
5. Save the image list using Save list or Save list As commands from the Images pulldown menu in order to save the changes into an image list file.
SETTING |
EFFECT |
|---|---|
Change |
Defines what status changes are possible: •To inactive - only active to inactive. •To active - only inactive to active. •Toggle - changes from active to inactive and vice versa. |
Camera |
Name of the camera for which image status changes are applied. Alternatively, the status of images from any camera can be modified. |
Quality |
Quality number. Status changes effect only images with the given quality. Quality 0 enables changes to all images. |